Pages

Monday 5 December 2011

Financiers


Taken from Wikipedia: Financier  is a term for a person who handles typically large sums of money. The term is French, and derives from finance or payment. The term financier has upscale and haughty connotations, and the stereotype portrayed by the term is typically of a wealthy and powerful person.

Pronounced as fee-nahng-syehr. These financiers fortunately don't cost a lot to bake. Unfortunately, these financiers don't make me rich. Here in Adelaide, they call them Friands and instead of the traditional gold bar shape, they are usually oval-ish. Taste wise, they're pretty similar, just that friands usually has some fillings on them.


So... What makes a financier a financier? The 2 key ingredients are almond meal and brown butter. Or as a french would say, beurre noisette. And if you would translate it literally back to English, it would mean hazelnut butter. Basically, it's just butter which has been cooked till it's melted and the milk solids starts to caramelise. You could add some milk powder while browning the butter to get a richer flavour.

Financiers are best eaten fresh out of the oven. If not, they can always be microwaved(10-30sec) to perk them up. They go well with a cup of tea or coffee and make a great afternoon snack.


Honey financiers by chocolate & zucchini
Makes 12

Ingredients
1 cup whole blanched almonds
1/3 cup sugar
3 tablespoons flour
1/4 teaspoon salt
85g unsalted butter
1/3 cup honey
2 eggs

Instructions

Preheat the oven to 180°C

In a food processor, mix the sugar and almond until finely ground. Combine with the flour and salt in a mixing bowl and set aside.
Melt the butter in a small saucepan over gentle heat. Bring to a simmer and cook for 2 minutes, until lightly browned and nutty-smelling. Add the honey and stir to melt. Pour the butter mixture into the dry ingredients and whisk until combined. Add in the eggs and whisk well. 

Butter the moulds if they're not nonstick or otherwise blessed with magical powers, then pour the batter in each individual mould, filling it up just to the rim. If you like, you can add raspberries (a line of three for the regular-sized ones, like buttons on a clown outfit, or just one on top of mini ones), pushing them down in the batter slightly, or pistachios, or chocolate chips (these you shouldn't push down).

Bake for 10 to 18 minutes, depending on the size and shape of your molds. The financiers should puff up a bit, get golden and slightly crusty on the edges, but they will still feel soft to the touch. Let stand for a few minutes, before turning them out on a rack to cool completely. The bottoms have a tendency to be a bit sticky when still warm, so you may want to put them upside down on the rack, or put them on a sheet of parchment paper.


Monday 31 October 2011

Thomas Keller Oreo


Also known as TKO amongst the food blogging community, this is an upmarket version of my childhood snack. As a kid, everyday during recess, I would head down to the canteen and buy myself a 3-in-a-pack Oreo cookie. Back then, those blue packets of heaven merely cost me 30 cents. I don't know about you but I'm never a fan of the Twist, Lick, Dunk technique. I head straight for the dunk. And since I never liked drinking milk, I would dunk them in Ribena. It might sound gross to you but to me, it was the perfect combination. The Ribena soften the Oreo AND made it taste sweeter.

Research have shown that dunking releases about ten times the flavour of the biscuit compared with eating it dry. But to be able to achieve that, one has to master the timing of the dunk. Dunk it for too long and all you'll get is a soggy mess, too short and the biscuit won't have enough time to be saturated by the liquid. It has to have that perfect balance of a soft yet still crunchy texture. Well, that's my preference anyway.


In case you were wondering, Thomas Keller is an American, 3 star Michelin chef who owns one of the best restaurant in the world, The French Laundry. Such a cute name I must say. I came to know of Chef Keller from the book, The Reach of a Chef by Michael Ruhlman. It was one of those book I randomly picked out in the library because I was attracted to the cover and luckily the book was an interesting read. It introduced me to famous real chefs in America. By real chef, I meant not celebrity chefs but those who actually slogged their way up in the kitchen.

Back to the cookie, the TKO does not taste exactly like an Oreo. It's much more refined. Try to get your hands on a good quality white chocolate if possible. This is only the 2nd time I have worked with white chocolate and quality means everything. A cheap white chocolate taste like solidified sweeten milk. A good white chocolate still has that chocolately feel to it.

If you don't own a mixer, you can do it by hand like I did. Just rub the butter and the dry ingredients together with your fingers. It will take some time to get everything together and your hands will get dirty but at least you'll be rubbing some love into the dough. Lol. The TKOs can be kept in an air tight container for up to 3 days. Somehow I find it tasted better the day after making it. 


Thomas Keller Oreo from The Essenceof Chocolate
Makes 24

Ingredients
1 1/2 cups plus 3 Tbsp all purpose flour
3/4 cup sugar
3/4 cup plus 1 Tbsp unsweetened cocoa powder
1/2 tsp baking soda
1 1/2 tsp salt
215g unsalted butter, cut into cubes, at room temperature

1/2 cup heavy cream
225g white chocolate, chopped

Instructions
For the Cookies: In a large mixing bowl, combine the flour, sugar, cocoa, baking soda, and salt, and mix on low speed. With the mixer running, add the butter, a piece at a time. The mixture will be dry and sandy at first, but after 2 minutes, it will form pebble-size pieces that start to cling together. Stop the mixer and transfer the dough to your board.

Separate dough into 2 pieces. Roll each piece of dough between 2 pieces of plastic wrap or parchment paper to 1/8" inch thick. Using a fluted cutter, cut into rounds. Scraps can be pieced together and rolled out again. Place 1/2" apart on baking sheets lined with parchment paper.

Bake for 12-15 minutes at 180C, rotating halfway through baking. Remove and cool in the pan for 5 minutes, then transfer cookies to a cooling rack. Cool completely.

For the FillingIn a small pan, bring the cream to a boil. Remove from heat and add the chocolate. Let it stand for 1 minute, then whisk to melt the chocolate until smooth. Transfer to a small bowl, and let stand for 6 hours to thicken up.


Friday 21 October 2011

Momofuku's Strawberry Shortcake


It's finally starting to feel like spring. The sun's doing its job, the girls are wearing shorts and strawberries are in season! Well, at least in Adelaide. You know when a fruit is in season when it goes for a dollar at the market and every stall has them. Back in Singapore, I've yet to see a punnet of strawberries  going for that price and tasting oh-so-yummy at the same time. Strawberries in Singapore somehow taste.. unstrawberryish. I can still recall the first strawberry I ate when I first arrived here in Adelaide. It was the juiciest, sweetest strawberry I've ever ate. My parotid glands are secreting saliva just thinking about it. 

Now, I first got to know about Momofuku sometime back in 2010. Back then, I was still in the army and had plenty of time to read. I think I read at least 2 books a month for that 2 years. Mostly cooking related books of course; not cookbooks but books on food, the restaurant industry and chefs' memoirs. It was Anthony Bourdain's book who introduced me to David Chang, owner and founder of the Momofuku empire. Momofuku stands for lucky peach in Japanese but David Chang was not born from the land of sushi. He's a Korean American who majored in religion, loves ramen and worked at a soba shop in Japan just so he could learn the art of making noodles. Cut the story short, David Chang is a genius when it comes to mixing asian ingredients with classical French technique. 

Ooo..!! I was googling up on David Chang and just found out that he's opening a restaurant in Sydney soon!


The recipe for the shortcake comes from Christina Tosi, Chef Chang's trusted pastry chef who is at the helm of Milk Bar - the dessert division of the Momofuku empire. She is about to publish a book soon which will no doubt be a hit. I for one will be getting my hands on this book as soon as it arrives on shore. Christina Tosi is a pastry chef who takes simple home baked desserts to a whole new level. Who in the world would have come up with desserts such as crack pie and cereal milk. She's the Pierre Herme of America if I do say so.

The shortcake here is like a sweet, salty, giant cookie. It's simply delicious on its on. Don't skim on the salt, 1 tablespoon might seem a lot but the saltiness just helps to balance that sweetness. When you bake the shortcakes, they will spread like a yogi doing splits. So make sure you leave plenty of space on the baking tray. If you can't find shortening or just don't wish to use it, you can simply replace it with equal amount of butter. Shortening will give the shortcake a crisper texture as oppose to all butter. 


Momofuku's Shortcakes by Christina Tosi
Make 8 servings

Ingredients
1 Egg, beaten
125ml Heavy Cream
210g Cups Plain Flour
100g Caster Sugar
75g Light Brown Sugar
1 Tbsp Sea Salt
1 1/2 tsp Baking Powder
120g Unsalted Butter, cut into small pieces and chilled
55g Vegetable Shortening, at room temperature
60g Icing Sugar

Method
Add the beaten egg into a small measuring cup and spoon off half of it. (Reserved for other use or discard them) Add enough heavy cream to the egg to make ½ cup. Stir briefly, and then put the mixture in the refrigerator to chill.

Combine the flour, caster sugar, brown sugar, salt, and baking powder in the bowl of a stand mixer outfitted with the paddle attachment and stir them together. Add the butter and shortening and turn the mixer on its lowest setting. Mix the fat in until the batter is gravely, with pea-sized lumps everywhere, which shouldn’t take much more than 4 minutes.

Once you have got the sandy, lumpy, dryish, short batter together, grab the cream mixture from the refrigerator and stream it into the batter, stirring it in with the machine still on its lowest speed. Do this for as short a time as humanly possible, just until the liquid is barely absorbed. Let the dough rest in the mixer bowl for 10 minutes.

Scoop the batter into little balls, using about 2 Tbsp for each (you can assist their shaping lightly with your hands) and line them up on a baking sheet. You should have 8 balls and chill in the refrigerator for at least 30 minutes and as long as overnight.

Heat the oven to 180˚C. Line a couple of baking sheets with parchment paper or Silpats.
Pour the icing sugar into a wide shallow bowl. Roll each of the shortcakes through the sugar to coat very lightly, tap off excess, and place the dusted cakes on the prepared baking sheets, with enough room between them allow them to double their footprint while baking.

Bake for 10 to 12 minutes. The cakes will spread and then rise-the baking powder in it will give them a final, poofy kick and the icing sugar on the outside should crackle when they’re ready. Over baked is preferable to under-baked with these cakes. If their centres fall after you pull them from the oven, bake them for another 60 to 90 seconds. Transfer to a rack and let cool.

Serve with macerated strawberries and generous dollop of whipped cream.


Macerated Strawberries
400g strawberries
55g sugar

One to 2 hours before you intend to serve them, gently toss the strawberries with the sugar; the sugar will draw out the juics from the strawberries. Serve cold or at rtp, using the macerating liquid as part of the dish - pouring it over the shortcakes and strawberries. (I added a dash of balsamic vinegar to liven thing up)


Wednesday 12 October 2011

Sea salt

Spent a day at Henley Beach having a picnic with some friends. The food was great and the company was awesome. The weather wasn't looking too friendly at first but thank goodness the clouds cleared later in the afternoon. This is the third beach I've been to since coming to Adelaide and I can't comment much since they all pretty much look the same to me.


I had recently came across a blog post about making your own salt. And since the sea was just right in front of me, I decided to give it a go. It was so simple, I wonder why I've never thought about it. All you have to do is collect the sea water, filter it and boil till you get salt! It does take some time for all the water to evaporate though.


Top left: After simmering for 2hr, you'll start seeing the NaCl crystal starting to form.
Bottom left/Top right: All the water have nearly evaporated, leaving behind solid crystals
Bottom right: The damp salt before it's been left to dry 

I wanted to get large salt crystals like Maldon's and so I made sure to turn down the heat to a simmer once half of the liquid was boiled away. This is to ensure that the crystal formation won't be agitated from the vigorous boiling action. After simmering the water for nearly 2 hours, I had to gently scoop up the crystals so that it won't break and transferred them to a bed of paper towels. Left it to dry overnight and woke up to beautiful salty crystals glimmering in the morning sun.


I ended up with about 2 tablespoons worth of salt from a litre of sea water. Taste wise, it's salty. Really salty. Not quite the fleur de sel from Guérande but more like henley de sel.  I didn't manage to achieve the crunchy texture I was hoping for but nonetheless I'm pretty proud of it. It's not everyday you get to tell someone you made your own salt.

Saturday 1 October 2011

Creme Brulee


French for burnt cream. This dessert needs no introduction. A rich silky vanilla custard topped with a caramelised crust and typically served in a ramekin. I don't know about you, but the best part about this dessert to me is shattering the layer of caramel. The cracking sound it makes as you hit your spoon against the top layer only to be greeted by the soft, creamy custard underneath it. This somehow reminds me of the anatomy of a tooth! Haha. The caramel representing the harder outer enamel layer while the custard is the softer inner layer of the dentine. And instead of a spoon, we use a high speed drill to get into that inner layer! 


Many people might not know this, but creme brulee might actually not be of French origin! There's a debate as to who invented the dish first; the English or the French. To me, it doesn't matter whoever it was who came up with it. Just like the brouhaha in 2009 about a Malaysian minister who attempted to "reclaim" what was/has been Singaporean dishes. 

The creation of a dish is a thought process of a chef who is influenced by the things around him. You take a little bit of that, borrow ideas from someone, make use of local ingredients and there you have it! An iconic dish that represents you as a chef and perhaps in the long run the nation's as well. Instead of arguing who owns the rights to a dish, we should be focusing on the future. Many chefs today like 
Heston Blumenthal and Wylie Dufresne are recreating old dishes, transforming classics into avant garde dishes. Although I'm a strong proponent for classic, traditional dishes, I am always amazed at the things these guys come up with.


This dessert requires you to invest in a blow torch if you want that caramelised top layer. Now, there's probably not much use for a blow torch at home and I admit, I've only used it once (not counting the time I tried lighting up the bbq pit with it). But if you're as hardcore as I am and willing to splurge on this one-dish-contraption, I'll advice you to buy yours at the local hardware shop instead. It's much cheaper compared to those "special chef blow torch" you'll find at any kitchen appliance store. They are after all, the same fire spitting gadget. 

The recipe below is by Alton Brown whom I talked about in my previous post. The recipe is a classic vanilla creme brulee. I would recommend that you skip the extract and use a real vanilla bean for this as an extract won't be able to provide that vanilla kick this dessert needs. I buy my vanilla bean from eBay as it is much much cheaper. You can choose to either get the AAA stuff or the cheaper "extract quality" bean. Either way, a bean is much more superior than any extract you can find. This recipe calls for vanilla sugar, but ordinary sugar is fine.

*To make your own vanilla sugar: Dry the vanilla bean, which was cooked in the cream mixture, and place it in a container full of sugar. That's pretty much it! The sugar can be kept for a long time, just give the container a shake occasionally. You can add more used vanilla bean into the container over time. 

As you can see from this recipe, a creme brulee requires lots of egg yolks. What to do with the whites? Make macarons! If not, they store well in the freezer. I usually portion them out in small ziplocks so that I only defrost what I need. If you don't have any ramekins, use those disposable aluminium bowls like what I have done. 


Crème brûlée by Alton Brown
Makes 6 servings

Ingredients


950ml heavy cream
1 vanilla bean, split and scraped
1 cup (225g) vanilla sugar, divided
6 large egg yolks
hot water


Directions

Preheat the oven to 160 degrees C.

Place the cream, vanilla bean and its pulp into a medium saucepan set over medium-high heat and bring to a boil. Remove from the heat, cover and allow to sit for 15 minutes. Remove the vanilla bean and reserve for another use.

In a medium bowl, whisk together 1/2 cup sugar and the egg yolks until well blended and it just starts to lighten in color. Add the cream a little at a time, stirring continually. Pour the liquid into 6 ramekins. Place the ramekins into a large cake pan or roasting pan. Pour enough hot water into the pan to come halfway up the sides of the ramekins. Bake just until the creme brulee is set, but still trembling in the center, approximately 40 to 45 minutes. Remove the ramekins from the roasting pan and refrigerate for at least 2 hours and up to 3 days.

Remove the creme brulee from the refrigerator for at least 30 minutes prior to browning the sugar on top. Divide the remaining 1/2 cup vanilla sugar equally among the 6 dishes and spread evenly on top. Using a torch, melt the sugar and form a crispy top. Allow the creme brulee to sit for at least 5 minutes before serving.


Wednesday 28 September 2011

Blueberry pancakes


Pancakes for breakfast is a rare and special occasion for me. It's not everyday I get to wake up early to prepare a nice warm breakfast (toasts don't count). I'm also never out for breakfast unless I'm on a holiday. During my last holiday in Sydney, I had pancakes two breakfasts in a row!


Now, I like my pancakes sweet. Whether it's blueberry, chocolate or ya ol' regular stack of plain pancake, it always taste best when there's maple syrup to sweeten things up. I understand that some like theirs savoury but the idea of having pancakes with bacon and eggs somehow just turns me off. 

Once upon a time, I never did like pancakes.. I can still recall as a kid, eating a banana pancake that was flat, rubbery and spongy! Not something you would describe pancakes. Haha. But because of my traumatic childhood pancake experience, I never ordered pancakes whenever I was out for breakfast. Till that one faithful day at a hotel in Chang Mai.


It was at that hotel's breakfast that my perception of pancakes changed. Our complimentary breakfast came as a set and pancakes was a part of it. Three small fluffy pancakes dusted with icing sugar served with maple syrup at the side. After that first bite, I was totally sold! Since then, I moved on from instant pancake mix (the kind which comes in a bottle where you add water and shake it till is looks like pancake batter) to making my own. I must admit, those bottled pancake mix are pretty decent. Especially on days when I can't be bothered to make my own.

The secret to a good pancake is a lumpy batter. An over mixed, smooth batter is not better. Don't be too concerned about that unmixed bit of flour. Remember, lumps = good pancakes! Another sure win tip to a good pancake is buttermilk. The acid in the buttermilk will react with the baking soda to produce air bubbles which makes your pancake light and fluffy. To those who love chemistry as much as I do:
NaHCO3 + H+ → Na+ + CO2 + H2O

*If you don't have buttermilk in the fridge, don't worry. You can simply make it at home with either vinegar or lemon juice. To make a cup of buttermilk, just add 1 tablespoon of vinegar/lemon juice to about 1 cup of milk. Let it sit for 5m
in and viola! Buttermilk is born.


The recipe below is by one of my favourite chef, Alton Brown, who is the creator/host of the popular Good Eats show. It was his show which got me interested in cooking as a kid. I used to watch the show on TV everyday after school. Here's the pancake episode if you're interested. 


Alton Brown's "Instant" Pancakes
Makes 12 pancakes

Ingredients
"Pancake mix"
6 cups (750g) all-purpose flour
1 1/2 teaspoons baking soda (check expiration date first)
3 teaspoons baking powder
1 tablespoon kosher salt
2 tablespoons sugar


Combine all of the ingredients in a lidded container. Shake to mix.
Use the mix within 3 months

2 eggs, separated
2 cups (470ml) buttermilk
4 tablespoons (55g) melted butter
2 cups (250g)  "Instant" Pancake Mix, recipe above
1 stick (110g)  butter, for greasing the pan
2 cups fresh fruit such as blueberries, if desired


Heat an electric griddle or frying pan to 180 degrees C. (If you are using a frying pan, place a few drops of water onto the pan. If the droplets are happily dancing on the surface, the pan is ready)


Whisk together the egg whites and the buttermilk in a small bowl. In another bowl, whisk the egg yolks with the melted butter.


Combine the buttermilk mixture with the egg yolk mixture in a large mixing bowl and whisk together until thoroughly combined. Pour the liquid ingredients on top of the pancake mix. Using a whisk, mix the batter just enough to bring it together. Don't try to work all the lumps out.


Lightly butter the griddle. Wipe off thoroughly with a paper towel. (No butter should be visible.)


Gently ladle the pancake batter onto the griddle and sprinkle on fruit if desired. When bubbles begin to set around the edges of the pancake and the griddle-side of the cake is golden, gently flip the pancakes. Continue to cook 2 to 3 minutes or until the pancake is set.


Serve immediately or remove to a towel-lined baking sheet and cover with a towel.

Sunday 25 September 2011

A day at the farmers' market


Spent a beautiful Sunday morning checking out the Adelaide Showground Farmers Market. I never knew the Adelaide Showground was this huge. The last time I was there, it was for a completely different reason. I discovered about the market when I was flipping through the Adelaide food guide by The Advertiser at the library. In the book, there was a section on the various farmers' market around Adelaide. Apparently there are 3 major farmers' markets (Willunga, Barossa, Showground)  and many smaller ones in Adelaide. Hopefully by the time I graduate, I'll have been to all of them. 

The sheltered area of the market
I was there at half past eleven and the crowd was pretty decent. Lots of families with young children in tow. There are 2 areas in the market. The indoor area is where most of the dried goods and bread stalls are at. There is also a cooking demo area where I managed to try some cold Vietnamese veggie rolls that the chef from Hilton was preparing. Outside, you'll be able to find all the fruits and vegetable stalls. 

The first thing I noticed at every stalls was that there were 2 different prices for the same item. Apparently you can become a member of the market and receive discounts. For more info about their membership check out their website

Freshly shucked oysters. $14 a dozen.

Outdoor area of the market
One thing you'll notice about the fruit and vegetable stalls is that the sellers grew the produce themselves. I overheard a guy telling his customer about when he harvested his celeries and what produce are in season. Since spring has just recently dawn upon us, the market was brimming with all kinds of vegetables. All the produce were reasonably priced and pretty much comparable with the Central Market in the city. 


Most stall place out samples of their products where you can try them out. All the stallholders I met were forthcoming about their products and were more than happy to let you taste test them. I enjoyed going up to most of the stall, interacting with the owners and learning more about what they were selling. I could sense a close knit community between the various stallholders as well as their regular customers. Overall, I had a wonderful time at the market and would definitely come back again. I just love supporting small businesses like these given how they provide a personal touch you can't find in a supermarket. 

A cute sign I spotted at the Bush Tucker Ice Cream stall
WHEN
Every Sunday 9am — 1pm
WHERE
Adelaide Showground, Leader Street, Goodwood


Friday 23 September 2011

Opera Cake


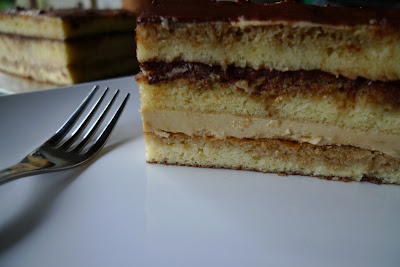
It all started with this cake. This was way back in december 2009. My first foray into food photography. I can't recall why I chose to make this cake. But damn. It was delicious. The Opera cake or L'Opera was created in Paris in 1900s at a pastisserie called Dalloyau. It is a multi layered cake composed of 6 layers: 3 layers of Joconde (soaked in coffee syrup) ,a layer of coffee buttercream and bittersweet chocolate ganache and finally topped with chocolate glaze. A joconde is a french almond cake, pretty much a sponge cake with an almond-ny flavour. Surprisingly, the cake was not as rich I expected it to be with all those layers. 


It took me about 5 hours to assemble the cake having to make each component separately but the results were worth it. Not too bad for my first attempt at a layered cake. If I had to make this cake again, I would make the joconde thinner and ensure that the cake is really cold before pouring over the glaze. If you are short on time, you can make each element on different days and assemble them whenever you're ready. 

The layering process minus the last 2 steps.


Opera Cake
Adapted from Dalloyau from Paris Sweets: Great Desserts from the City's Best Pastry Shopsby Dorie Greenspan (Broadway Books, 2002)

Ingredients
Makes about 20 servings

The cake:

  • 6 large egg whites, at room temperature
  • 2 tablespoons (30 grams) granulated sugar
  • 2 cups (225 grams) ground blanched almonds
  • 2 1/4 cups (225 grams) confectioners sugar, sifted
  • 6 large eggs
  • 1/2 cup (70 grams) all-purpose flour
  • 3 tablespoons (45 grams) unsalted butter, melted and cooled briefly

The coffee syrup:
  • 1/2 cup water
  • 1/3 cup sugar
  • 1 1/2 tablespoons (7 grams) instant espresso or coffee

The coffee buttercream:
  • 2 tablespoons (10 grams) instant espresso or coffee
  • 2 tablespoons (15 grams) boiling water
  • 1 cup (100 grams) sugar
  • 1/4 cup (30 grams) water
  • Pulp of 1/4 vanilla bean
  • 1 large whole egg
  • 1 large egg yolk
  • 1 3/4 sticks ( 200 grams) unsalted butter, at room temperature

The chocolate ganache:
  • 8 ounces (240 grams) bittersweet chocolate, finely chopped
  • 1/2 cup (125 grams) whole milk
  • 1/4 cup (30 grams) heavy cream
  • 4 tablespoons ( 60 grams) unsalted butter, at room temperature

The chocolate glaze:
  • 5 ounces (150 grams) bittersweet chocolate, finely chopped
  • 1 stick (115 grams) unsalted butter

Instructions
1. To make the cake: Position the racks to divide the oven into thirds and preheat the oven to 220 degrees C. Line two 12 1/2-x15 1/2-inch (31-x-39-cm) jelly-roll pans with parchment paper and brush with melted butter. (This is in addition to the quantity in the ingredient list.)
2. Working in a clean dry mixer bowl fitted with the whisk attachment, beat the egg whites until they form soft peaks. Add the granulated sugar and beat until the peaks are stiff and glossy. If you do not have another mixer bowl, gently scrape the whites into another bowl.
3. In a mixer fitted with the paddle attachment, beat the almonds, confectioners sugar and whole eggs on medium speed until light and voluminous, about 3 minutes. Add the flour and beat on low speed only until it disappears. Using a rubber spatula, gently fold the meringue into the almond mixture, then fold in the melted butter. Divide the batter between the pans and spread it evenly to cover the entire surface of each pan.
4. Bake the cakes for 5 to 7 minutes, or until they are lightly browned and just springy to the touch. Put the pans on a heatproof counter, cover each with a sheet of parchment or wax paper, turn the cakes over and unmold. Carefully peel away the parchment, turn the parchment over and use it to cover the exposed sides of the cakes. Let the cakes come to room temperature between the parchment or wax paper sheets. (The cakes can be made up to 1 day ahead, wrapped and kept at room temperature.)
5. To make the syrup: Stir everything together in a small saucepan and bring to the boil. Cool. (The syrup can be covered and refrigerated for up to 1 week.)
6. To make the buttercream: Make a coffee extract by dissolving the instant espresso in the boiling water; set aside.
7. Bring the sugar, water and vanilla bean pulp to a boil in a small saucepan; stir just until the sugar dissolves. Continue to cook without stirring until the syrup reaches 124 degrees C, as measured on a candy or instant-read thermometer. Pull the pan from the heat.
8. While the sugar is heating, put the egg and the yolk in the bowl of a mixer fitted with the whisk attachment and beat until the eggs are pale and foamy. When the sugar is at temperature, reduce the mixer speed to low and slowly pour in the syrup. Inevitably, some syrup will spin onto the sides of the bowl - don't try to stir the spatters into the eggs. Raise the speed to medium-high and continue to beat until the eggs are thick, satiny and room temperature, about 5 minutes.
9. Working with a rubber spatula, beat the butter until it is soft and creamy but not oily. With the mixer on medium speed, steadily add the butter in 2-tablespoon (30-gram) chunks. When all the butter has been added, raise the speed to high and beat until the buttercream is thickened and satiny. Beat in the coffee extract. Chill the buttercream, stirring frequently, until it is firm enough to be spread and stay where it is spread when topped with a layer of cake, about 20 minutes. (The buttercream can be packed airtight and refrigerated for 4 days or frozen for 1 month; before using, bring it to room temperature, then beat to smooth it.)
10. To make the ganache: Put the chocolate in a medium bowl and keep it close at hand. Bring the milk and cream to a full boil, pour it over the chocolate, wait 1 minute, then stir gently until the ganache is smooth and glossy.
11. Beat the butter until it is smooth and creamy, then stir it into the ganache in 2 to 3 additions. Refrigerate the ganache, stirring every 5 minutes, until it thickens and is spreadable, about 20 minutes. (The ganache can be packed airtight and refrigerated for up to 3 days or frozen for 1 month; bring to room temperature before using.)
12. To assemble the cake: Line a baking sheet with parchment or wax paper. Working with one sheet of cake at a time, trim the cake so that you have two pieces: one 10-x-10-inches (25-x-25-cm) square and one 10-x-5-inches (25-x-12.5-cm) rectangle. Place one square of cake on the parchment and moisten the layer with coffee syrup. Spread about three-quarters of the coffee buttercream evenly over the cake. (If the buttercream is soft, put the cake in the freezer for about 10 minutes before proceeding.) Top with the two rectangular pieces of cake, placing them side by side to form a square; moisten with syrup. Spread the ganache over the surface, top with the last cake layer, moisten, then chill the cake in the freezer for about 10 minutes. Cover the top of the cake with a thin layer of coffee buttercream. (This is to smooth the top and ready it for the glaze - so go easy.) Refrigerate the cake for at least 1 hour or for up to 6 hours; it should be cold when you pour over the glaze. If you're in a hurry, pop the cake into the freezer for about 20 minutes, then continue.
13. To glaze the cake: Bring the butter to a boil in a small saucepan. Remove the pan from the heat and clarify the butter by spooning off the top foam and pouring the clear yellow butter into a small bowl; discard the milky residue. Melt the chocolate in a bowl over—not touching—simmering water, then stir in the clarified butter. Lift the chilled cake off the parchment-lined pan and place it on a rack. Put the rack over the parchment-lined pan and pour over the glaze, using a long offset spatula to help smooth it evenly across the top. Slide the cake into the refrigerator to set the glaze and chill the cake, which should be served slightly chilled. At serving time, use a long thin knife, dipped in hot water and wiped dry, to carefully trim the sides of the cake so that the drips of glaze are removed and the layers revealed.
Storing: Each element of the cake can be made ahead, as can the assembled cake. The cake can be kept in the refrigerator, away from foods with strong odors, for 1 day, or you can freeze the cake, wrap it airtight once it is frozen, and keep it frozen for 1 month; defrost, still wrapped, overnight in the refrigerator.


If you do not have the exact baking pan dimension, roughly pour in about 1-2cm worth of batter into whatever pan you have in your kitchen. You might have to do this 3-4 times depending on how small/big your pan is. Adjust the baking time as necessary. The raw batter cannot be kept thus I suggest that you bake everything and freeze the leftovers. Do note that this is traditionally a square cake and individual servings are sliced into rectangles.
Ensure that the topmost layer of buttercream is smooth and cold to the touch before pouring the glaze over. This will ensure a nice unblemished top. 
The cake should be taken out of the fridge and left at room temperature before serving as the buttercream will tend to solidify when it's cold.
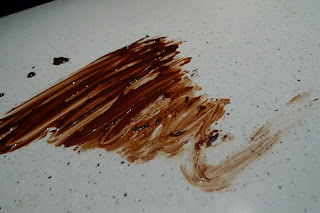
What do you do you've got leftover glaze? Make a mess!